When restoring or maintaining a UK or European classic car from the Fifties or Sixties, door hinges are often overlooked until problems become obvious. Sagging doors, uneven panel gaps, wind noise, or difficulty latching are all signs that hinge wear may be present. Regular inspection and timely replacement help preserve both body alignment and paintwork.
 The first step is careful assessment. With the door slightly open, lift it gently at the outer edge. Excessive vertical movement usually indicates worn hinge pins or bushes. Check for visible wear around the hinge knuckles, elongated mounting holes, cracked welds, or loose securing bolts. On cars such as the Morris Minor or Volkswagen Beetle, hinge wear is common due to age and frequent use.
 It should always be borne in mind that welded door hinges cannot be adjusted or replaced as complete units. If they are found to be worn, only the upper and lower hinge pins can be renewed.
On the upside, bolted hinges can not only be adjusted but also replaced, a task that is considerably easier than replacing hinge pins.
The simplest manually operated hand tools are all that are required for the job/ These should include a hammer, drift punch, puller and press tool, screwdriver, open-ended spanner, locking pliers (mole grips), support stand, cleaning cloths, oil, grease, door hinges or hinge pins.
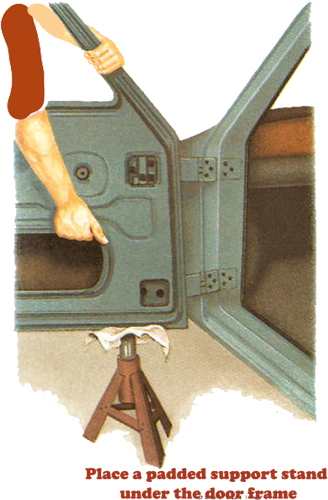
Before removal, support the door securely. A padded trolley jack or adjustable stand placed under the door’s lower edge prevents strain on the remaining hinge. Mark around the hinge plates with masking tape or a scribe to record the original position; this makes realignment far easier later.
 If the hinges are bolted on, removal is straightforward: the securing bolts should be undone and carefully separated the hinge from the A-post and door frame. Where hinges are welded and removable pins, need to be used, the worn hinge pin should be driven out using a punch and hammer. Replacement pins and bronze bushes are widely available from classic parts suppliers.
When fitting new hinges or pins, lightly lubricate the moving surfaces with grease before assembly. Refit the door loosely at first, checking panel gaps along the wing and sill. Gradually tighten bolts while adjusting the door to achieve even gaps and smooth latch engagement.
 Finally, apply a small amount of oil to the hinge pivot points during routine servicing. Properly maintained hinges ensure smooth operation, protect body alignment, and contribute significantly to the overall quality of a classic restoration.
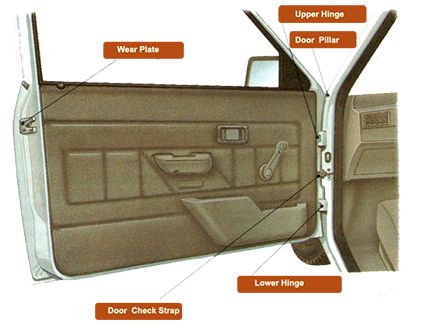
Close the winding window and remove the window winder and door handles. The door trim panel can then be carefully levered off.
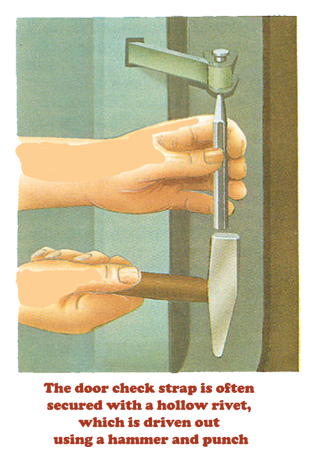
Press out the rivet of the door check strap using a screwdriver or drive it out with a hammer and punch. In some cases, a retaining clip must also be removed.
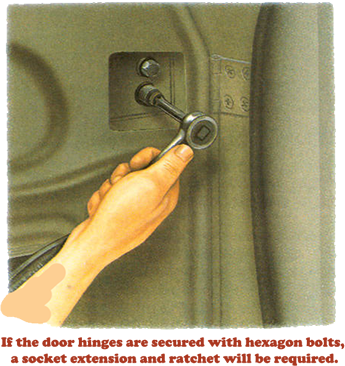
Two openings in the door frame reveal the bolts securing the hinge section. You will need an assistant to remove the door. To prevent the door from falling to the ground after removing the screws, place a padded support stand beneath the lower edge of the door frame.
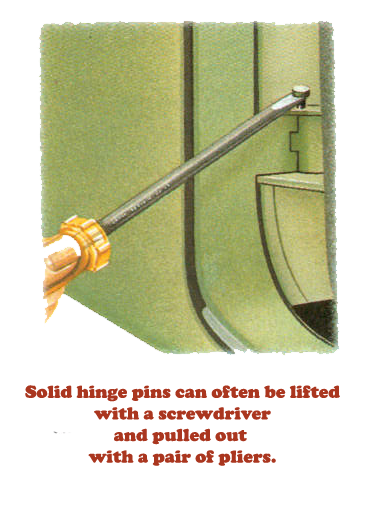
Before fitting replacement parts, check whether removal of the hinge pins on welded hinges can be carried out using a punch and hammer. If the pins are dry and seized, it may be better to have the job carried out by a specialist.
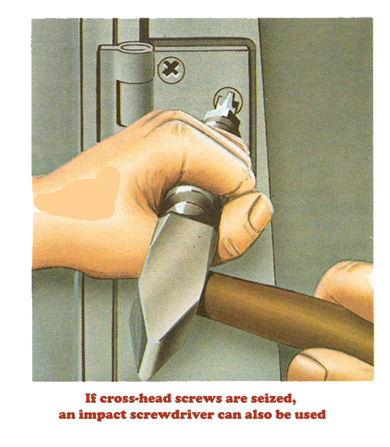 If plastic caps are fitted over the hinge pins, remove them first. When driving out the pins, proceed very carefully, as there is a real risk of damaging the bodywork.
If concealed hinges cannot be reached with a punch and hammer, a special puller must be used. Such tools are generally available only in specialist workshops, making it advisable to have the work carried out professionally.
 First, remove all screws from the lower door hinge, then those from the upper hinge. Your assistant must hold the door firmly to prevent it from striking the front wing edge.
If the hinge pins can be moved easily, first detach the door check strap, which is usually secured with a simple hollow rivet. This can be pressed out with a screwdriver and removed with pliers.
It is common practice to grease and oil the new hinges before and after installation. Paint markings on the original hinge will be a considerable help in determining the correct position.
Once the door is mounted, adjust the hinges and the door lock alignment before refitting the trim panel and operating components.